Valentine’s Heart Wine Glasses

Years ago I was comissioned by a coworker to make a set of wine glasses for her S.O.

She wanted them to have Valentine’s heart candies on them with various sayings, and to have their names on the base (of the glasses with stems). At the time I did not yet own a Cricut, so while my immediate go-to nowadays would be to make the hearts and lettering out of vinyl, that wasn’t an option for me then. I am still proud of how the final glasses turned out, and will now take this opportunity to brag about them to strangers on the internet, like you do.

So how did I paint these glasses if I didn’t have a Cricut and have the drawing ability of a banana slug? I cheated, of course! I printed out pictures of hearts on plain paper, cut them out, taped them to the inside of the glasses, and painted the outside of the glass accordingly. Think of it less as cheating and more as adapting your methods to match your skill level in order to achieve your desired goal. My brain and my nearly-useless hands met in the middle. It was, admittedly, a longer trip for my brain…

Here I am getting the basic shape of the heart and applying a first coat of paint.

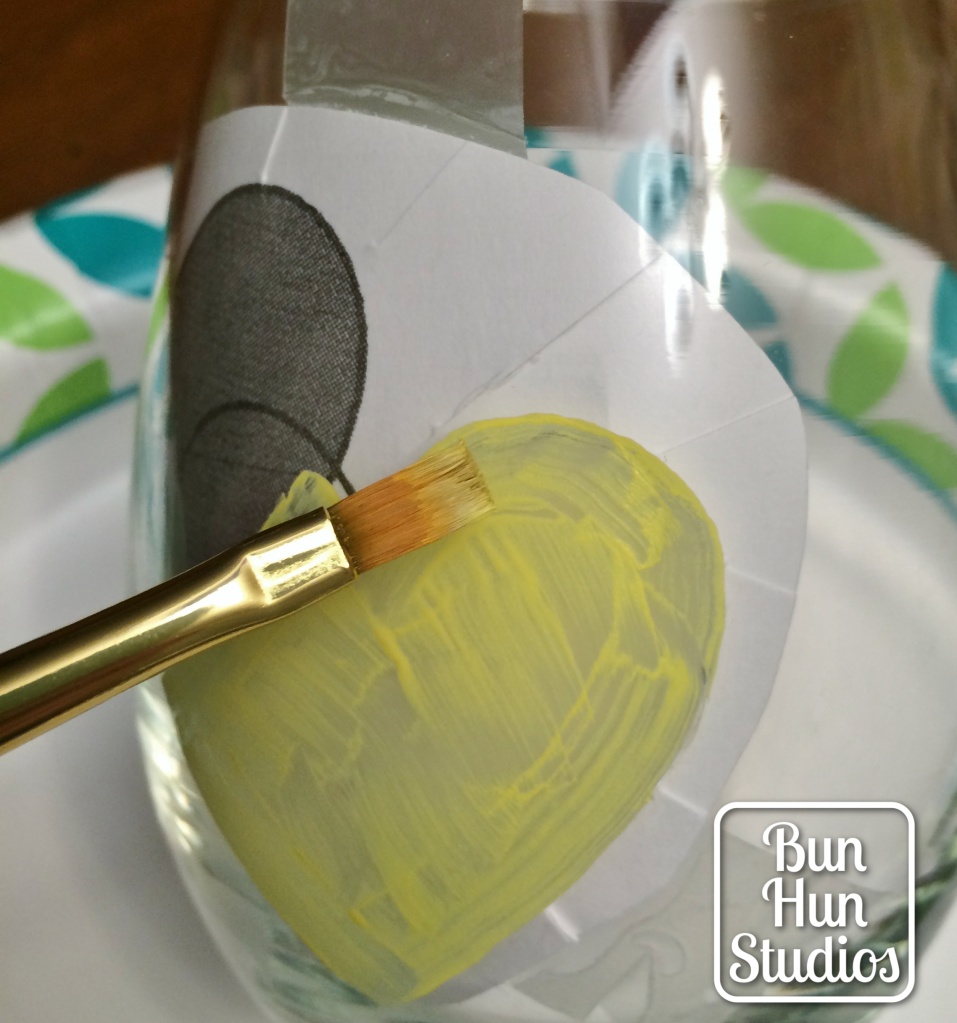
I used 2-3 coats of paint per heart because, as you can see, a single coat was VERY rough looking and generally just a hot mess. I painted one or two large hearts per glass with the intent to give them sayings, and then several small hearts all around to fill the empty space. For the sayings, I knew I couldn’t trust myself to hand write them on. I mean, I couldn’t even paint decent hearts without a stencil – lettering was out of the question. So I got myself some alphabet stamps and a red ink pad!

Looking back, I’m not sure how I held the stamp, the wine glass, and the camera to take this picture

The stamps worked pretty well, though some of the ink ended up a little patchy. I did not trust myself to be able to reapply the stamps in exactly the same position in order to make it better, so I touched it up with red paint and a thin paintbrush. Some of the letters got a little messy, and that couldn’t be fixed without adding more paint, so I did what I could to fix what I could and left the rest as that “handmade” charm. There’s no question that these glasses were hand painted, but with love, so it’s endearing.

I followed the instructions on the paint bottles to cure the paint onto the glasses. This involved placing them in the cool oven, turning it on, letting it get to temp, then turning it off and leaving them in there until it was completely cool again. It helps keep the paint on the glasses even after washing (though I think still hand wash only). Now that I look at them again, I feel like I want to make myself a travel cup with candy hearts on it – but out of vinyl and letting the Cricut handle the lettering.

Birthday Sale!

It’s my birthday this week, so everything in the shop is on sale!

Starting today, Sept. 12, 2022 and ending 11:59pm Saturday, Sept. 17, 2022 everything in the shop is 10% off! This sale will also be applied to any custom orders that are submitted and paid for before the sale’s end.

And as always, orders over $35 ship for free!

Bunny Baby Shower

One thing you need to know about me: I love party supplies. I love shopping for party supplies, I love looking at party supplies, and as you can probably guess, I love making my own party supplies. So when I was pregnant with my daughter and my mom and mother-in-law were planning a baby shower, I begged to be allowed to make the invitations, favors, and decor.

They didn’t like the idea at first, but realized if I didn’t do it then they would have to do it, and I was WAY more enthusiastic about it than they were, so they agreed. Can you guess what theme I chose?

If you guessed bunnies, you are right!

I had decided to use bunnies in my daughter’s nursery, so a bunny shower was a great way to get ready for her arrival. I based the invitations off this similar design I had seen on Pinterest, but obviously changed the unicorn into a bunny. The white paper was irridescent and shimmered so nicely with the gold glitter border! The eyelashes were cut out of a flocked paper, so they were velvety and fuzzy, which was such a cute touch.

Here are the full contents of the outer invitation envelope including bunny sleeve, invitation, and diaper raffle ticket

Guests received a pink envelope in the mail with their names and addresses printed on the front, and inside was this sweet little bunny with the invitation and diaper raffle tickets. If you are not familiar with a diaper raffle, it is when guests bring a pack of diapers separate from their shower gift which enters them into a raffle for a prize.

Once the invitations were sent, I had to focus on the next big task: favors! I always struggle with what to give as favors, but I had a brainstorm and thought of a very cute and practical gift for the guests.

The favor cards included my name and the date of the shower

Simple pearl earrings are an incredibly versatile accessory, so I figured they would be fine for all the guests at the shower regardless of age or general tastes. And by presenting them on these adorable little cards as bunny tails, who could resist? As you can see, I mimicked the look of the invitation on all of the other paper cards and accessories for a uniform appearance throughout the party.

I am generally a fan of cupcakes instead of cake at parties because each guest gets their own and serving multiple flavors is easier. No time is dedicated to slicing a cake or remembering which side or tier had which flavors – it’s usually fairly obvious and they can be handed out quickly and easily. Plus, it’s a perfect chance to make cupcake toppers, which are a very easy way to add personality to storebought or homemade cupcakes. I designed these bunny ear cupcake toppers after seeing something similar on Pinterest, but I copied the ears from the invitation and reused them for the shape of the toppers so that it better fit with the exact look I had established.

The cupcakes were displayed on a table next to the favors

For the favors, I decorated a crate I had at home with a bunny garland and a hilarious pun banner made from the same pink, gold, and irridescent white papers that had been used throughout the party. Guests were free to pick them up whenever they had a moment during the party.

Glitter gold bunnies and pom pom buns as table decor

For the tables, I bought a pack of tiny bunny figurines and painted them gold, then covered them in glitter. Then I covered them in clear coat so they didn’t just shed glitter everywhere. One of my friends took a few and still uses them in her Easter decor to this day, and they are as glittery as ever!

I saw some white waffle-fold balls at the party store and couldn’t resist giving them bunny ears using the template from the invitation and cupcake toppers. I added them to the tables for a little height variation and visual interest.

The tables were finished with some milk bottles that I had made for a party years before. I got blank milk bottles and used the same process as I’d used for the bunny figures to add gold glitter. Half of the bottles had large gold glitter polka dots all over them, and half just had glitter gold for the bottom half. They were mixed up and set in groups on the tables with sprigs of baby’s breath in them. You can see a little peek of them in the picture above.

Together, the gold bunnies, pom pom bunnies, and bottles with flowers added interest to the tables without taking up too much space, so the guests didn’t have to struggle to fit their plates and drinks around it all.

It was a very cute party, if I do say so myself, and I loved how everything came together! If you see anything you like and would like me to make you something similar for your own party or event, hit me up here or on any of my social sites and I would be happy to get you a quote!

Always Crafting!

I have made many, many crafts and projects over the years. Some have been for myself, some for friends, some for holidays, some for parties or events – I’ve made a lot! This page is where I will feature projects I’ve made as a way to showcase some of my skills and designs that aren’t featured in my Etsy shop. If you see anything here that you like and want to discuss having something like it made just for you, be sure to get in touch through email, Etsy, or social media!